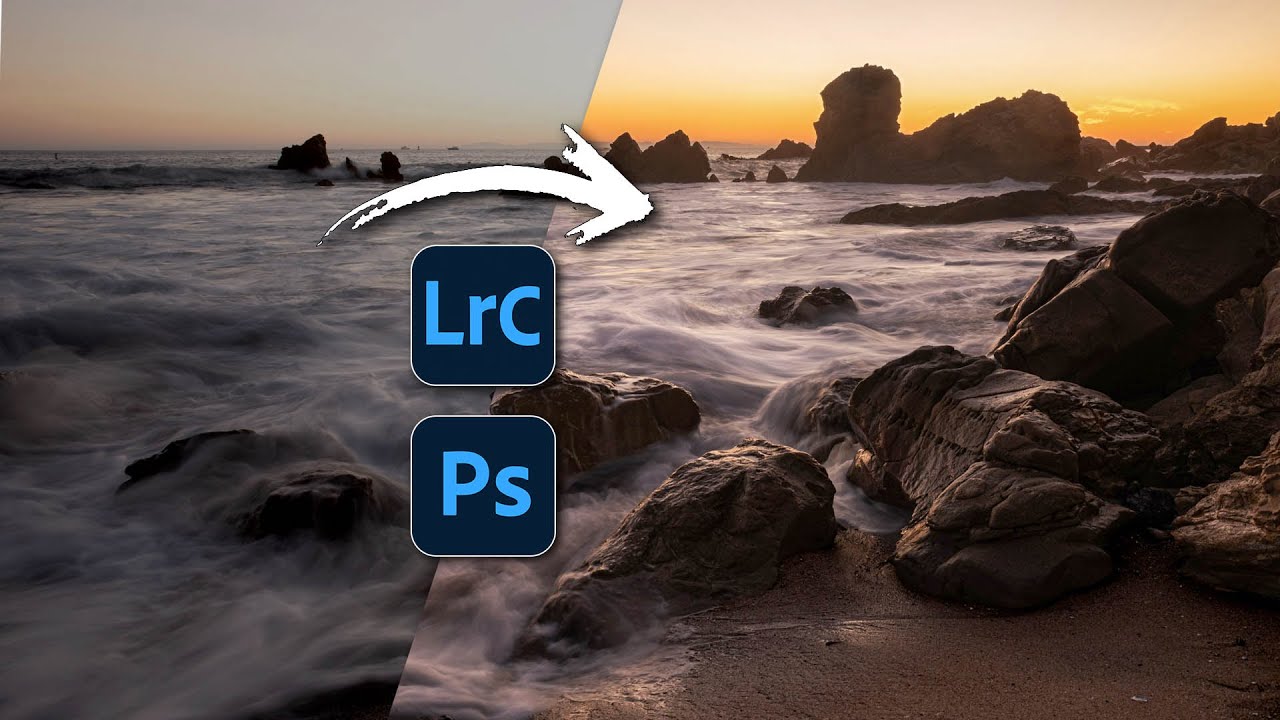
There’s a specific kind of frustration that comes from standing in front of a scene that stops your breath, making the exposure, and then opening the raw file later to find something flat and unconvincing. The sky is blown. The foreground is a mudhole. The horizon tilts just enough to bother you. After twenty years of doing this, I still run into it constantly, especially with wide-angle shots taken in high-contrast morning light. The problem isn’t the camera. It’s knowing what to do with the file afterward.
That’s why I keep returning to start-to-finish edit breakdowns from photographers who work at a high level and share their reasoning, not just their clicks. Watch the full tutorial on YouTube - in this Matt Kloskowski tutorial, he takes a raw landscape file with a challenging dynamic range and works through it from scratch, making decisions out loud in a way that’s genuinely useful. What follows is my breakdown of his approach, written so you can follow along in Lightroom without needing to pause and rewind every thirty seconds.
The core lesson here is one I try to hammer home in my own workshops: global adjustments are almost never enough for a scene with extreme light variation. When your sky and foreground are fighting each other, you have to separate them and treat them independently. That’s the thread that runs through this entire edit.
Step 1: Fix Lens Distortion Before You Crop
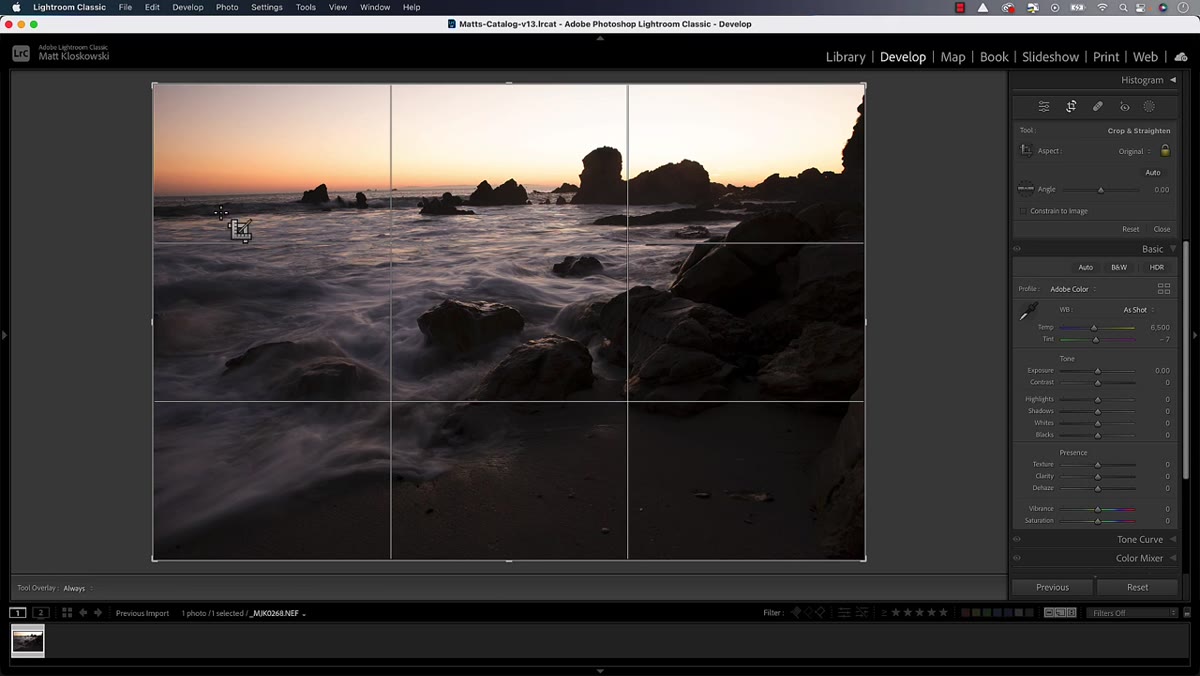 Lens Corrections panel open with Enable Profile Corrections checked
Before touching the crop tool, go to the Lens Corrections panel in Lightroom (called Optics in Camera Raw) and enable Profile Corrections. Lightroom will detect the lens automatically and correct barrel distortion, which is especially common with wide-angle glass. Also check the Remove Chromatic Aberration box while you’re there. On a high-contrast image with a bright sky meeting a dark landscape, chromatic aberration shows up as colored fringing along edges, and it’s worth eliminating before you start making tonal decisions.
Lens Corrections panel open with Enable Profile Corrections checked
Before touching the crop tool, go to the Lens Corrections panel in Lightroom (called Optics in Camera Raw) and enable Profile Corrections. Lightroom will detect the lens automatically and correct barrel distortion, which is especially common with wide-angle glass. Also check the Remove Chromatic Aberration box while you’re there. On a high-contrast image with a bright sky meeting a dark landscape, chromatic aberration shows up as colored fringing along edges, and it’s worth eliminating before you start making tonal decisions.
The reason to do this before cropping is simple: lens correction can shift and warp the image slightly, which can undo a crop you were happy with. Get the geometry right first, then compose.
Step 2: Straighten and Crop
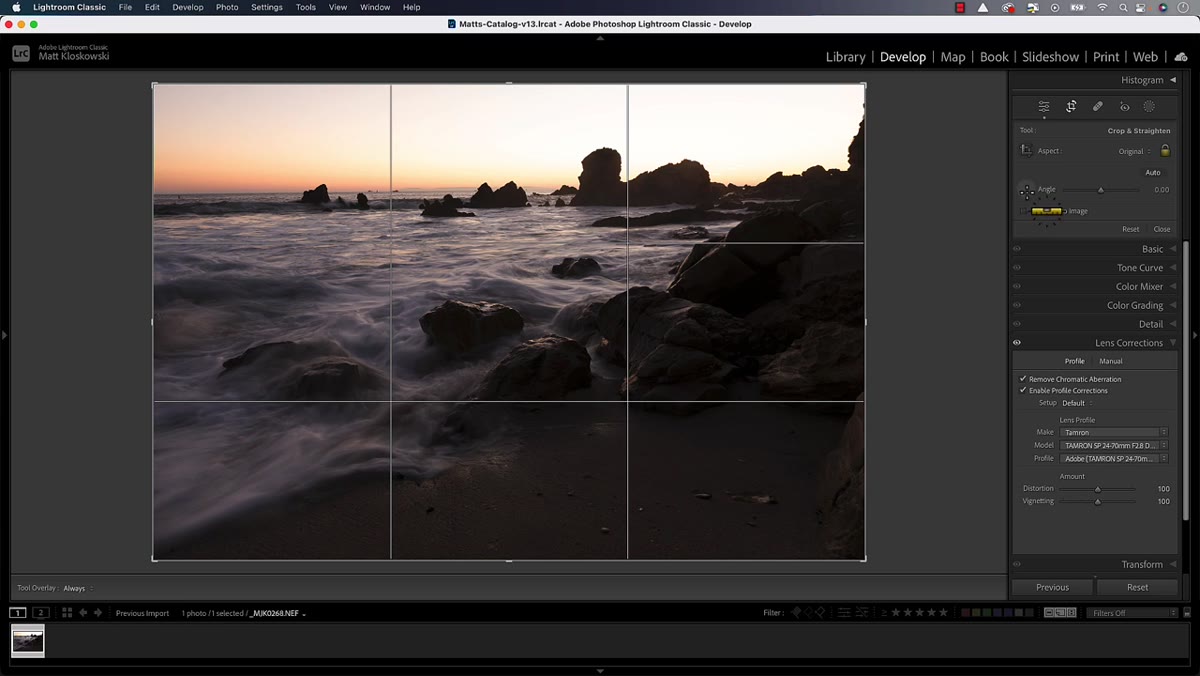 Crop tool active, user dragging along the horizon line
With lens correction applied, open the Crop tool (R in Lightroom, C in Camera Raw - worth remembering since they’re different). Rather than fussing with the angle slider, use the straighten method: click and drag along a section of the horizon line. You don’t need to drag across the entire image. Find a clean, level portion of the horizon and draw your line there. Lightroom reads the angle and rotates accordingly.
Crop tool active, user dragging along the horizon line
With lens correction applied, open the Crop tool (R in Lightroom, C in Camera Raw - worth remembering since they’re different). Rather than fussing with the angle slider, use the straighten method: click and drag along a section of the horizon line. You don’t need to drag across the entire image. Find a clean, level portion of the horizon and draw your line there. Lightroom reads the angle and rotates accordingly.
Once the image is level, refine the crop composition. This is a judgment call and varies by image, but the goal is to remove anything that doesn’t serve the frame. Matt treats cropping as flexible in the workflow, doing it first when it’s visually bothering him, sometimes last when he’s not sure. I tend to agree. If the framing is nagging at me, fix it early so every subsequent decision is made on the final composition.
Step 3: Skip Global Adjustments, Go Straight to Masking
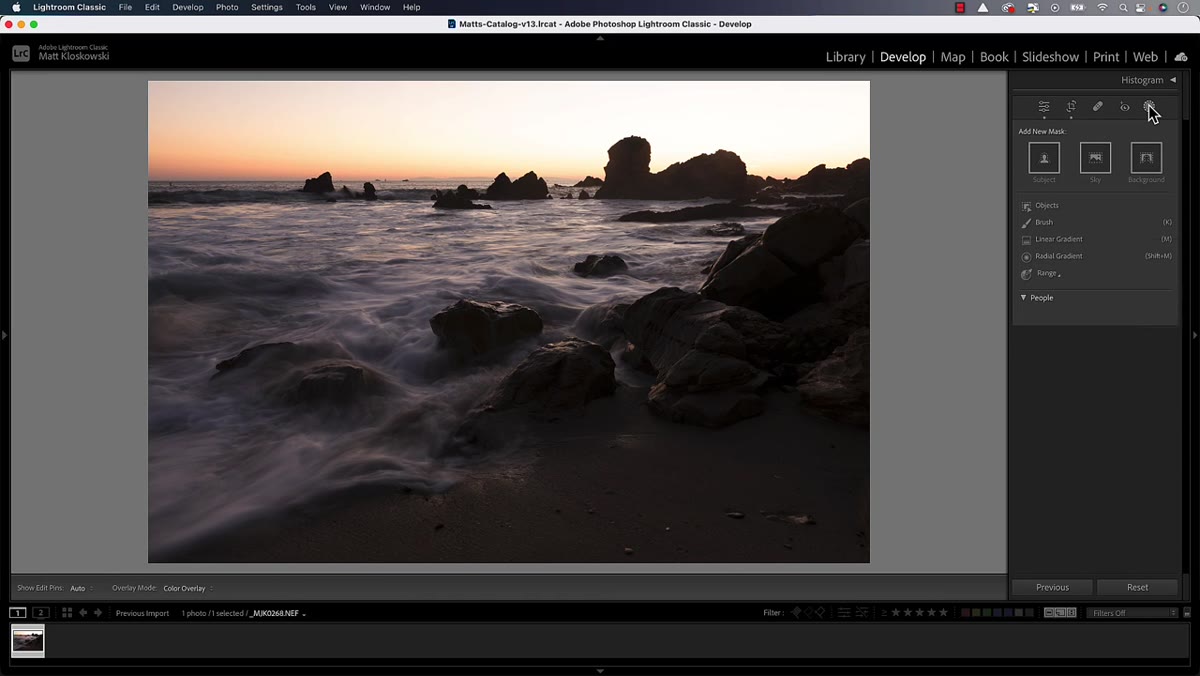 Masking panel open, mask options visible on screen
This is where Matt’s approach diverges from what most beginners do, and it’s the most important conceptual shift in the whole video. When a scene has a wide dynamic range, reaching for the basic panel sliders first puts you in a losing position. Lifting shadows to see the foreground blows the sky further. Pulling highlights to save the sky muddies the ground. You’re pulling in opposite directions on one rope.
Masking panel open, mask options visible on screen
This is where Matt’s approach diverges from what most beginners do, and it’s the most important conceptual shift in the whole video. When a scene has a wide dynamic range, reaching for the basic panel sliders first puts you in a losing position. Lifting shadows to see the foreground blows the sky further. Pulling highlights to save the sky muddies the ground. You’re pulling in opposite directions on one rope.
Instead, go directly to the Masking panel and plan to make separate adjustments for the sky and the foreground. This isn’t extra work. It’s the right order of operations for this kind of image.
Step 4: Use a Linear Gradient to Darken the Sky
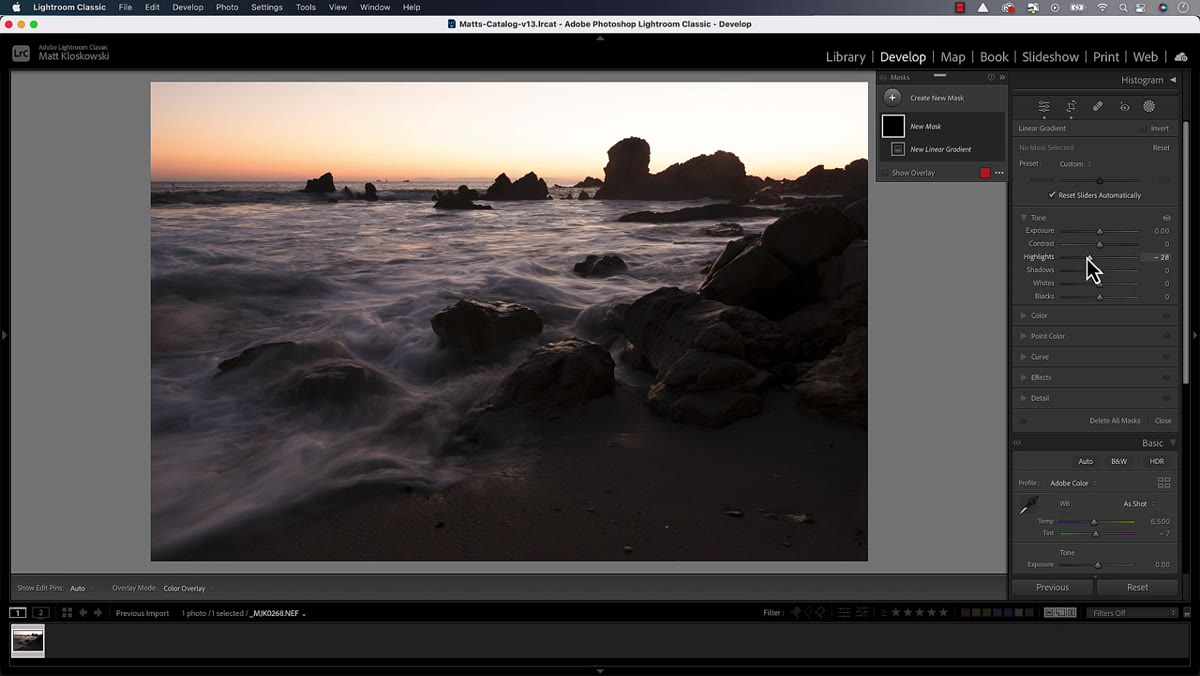 Linear gradient dragged from top, center line positioned below horizon
Matt makes a specific choice here worth understanding. Rather than using the “Select Sky” AI mask, he uses a Linear Gradient. The reason is practical: the AI sky selection tends to create a hard, visible line at the horizon when you pull the exposure down. On a clean, open landscape, that line reads as artificial and distracting.
Linear gradient dragged from top, center line positioned below horizon
Matt makes a specific choice here worth understanding. Rather than using the “Select Sky” AI mask, he uses a Linear Gradient. The reason is practical: the AI sky selection tends to create a hard, visible line at the horizon when you pull the exposure down. On a clean, open landscape, that line reads as artificial and distracting.
With the Linear Gradient, drag from the top of the frame downward, and make sure the center line of the gradient falls just below the horizon. This ensures the darkening effect covers the full sky without creating an abrupt edge. From there, pull the Highlights slider down significantly. Matt’s preference is to target highlights rather than overall exposure, which preserves the mid-tone character of the sky while reining in the brightest areas. Think of it as deflating the sky rather than dimming it.
Step 5: Build a Separate Mask for the Foreground
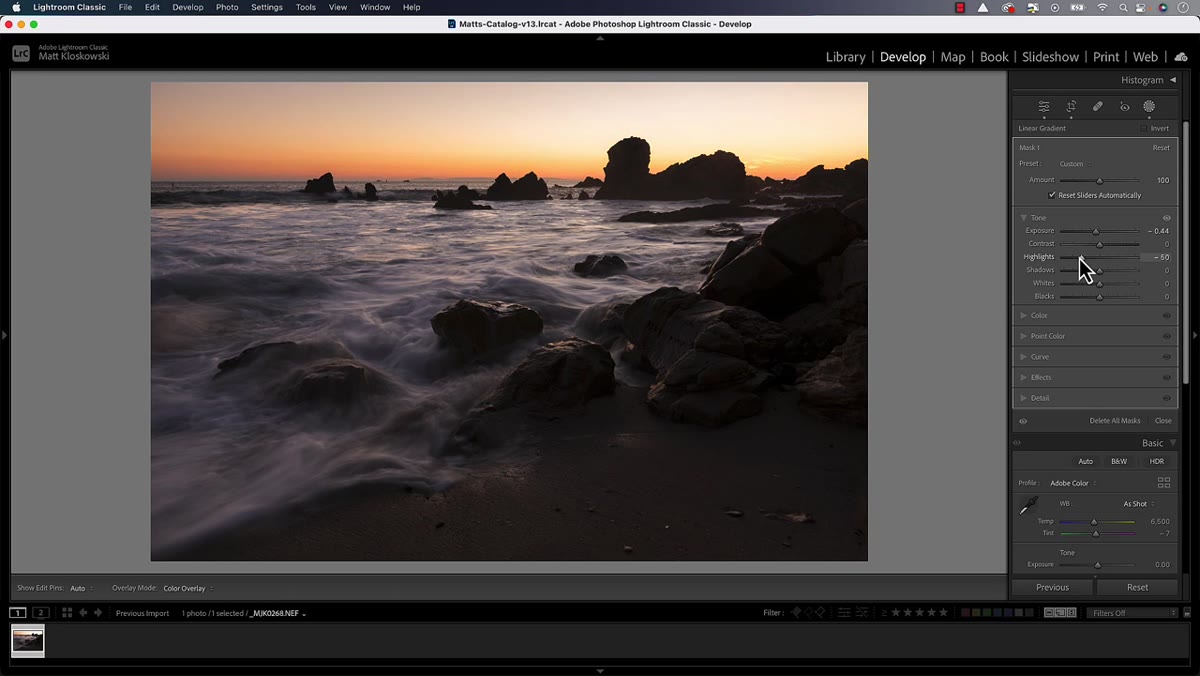 New mask created for foreground, luminance or gradient selection visible
With the sky handled, the foreground needs its own mask and its own set of adjustments. Create a new mask - either another Linear Gradient working upward from the bottom, or use the Select Subject or Range Mask tools depending on how complex the foreground is. The point is that the foreground likely needs lifted shadows, added clarity, and possibly some warmth, all adjustments that would have wrecked the sky if applied globally.
New mask created for foreground, luminance or gradient selection visible
With the sky handled, the foreground needs its own mask and its own set of adjustments. Create a new mask - either another Linear Gradient working upward from the bottom, or use the Select Subject or Range Mask tools depending on how complex the foreground is. The point is that the foreground likely needs lifted shadows, added clarity, and possibly some warmth, all adjustments that would have wrecked the sky if applied globally.
Working in separate masks lets you push each zone as far as it needs to go without the adjustments fighting each other. It’s the same logic behind shooting with graduated ND filters in the field, except you have far more precision in post.
Step 6: Return to the Basic Panel for Global Refinements
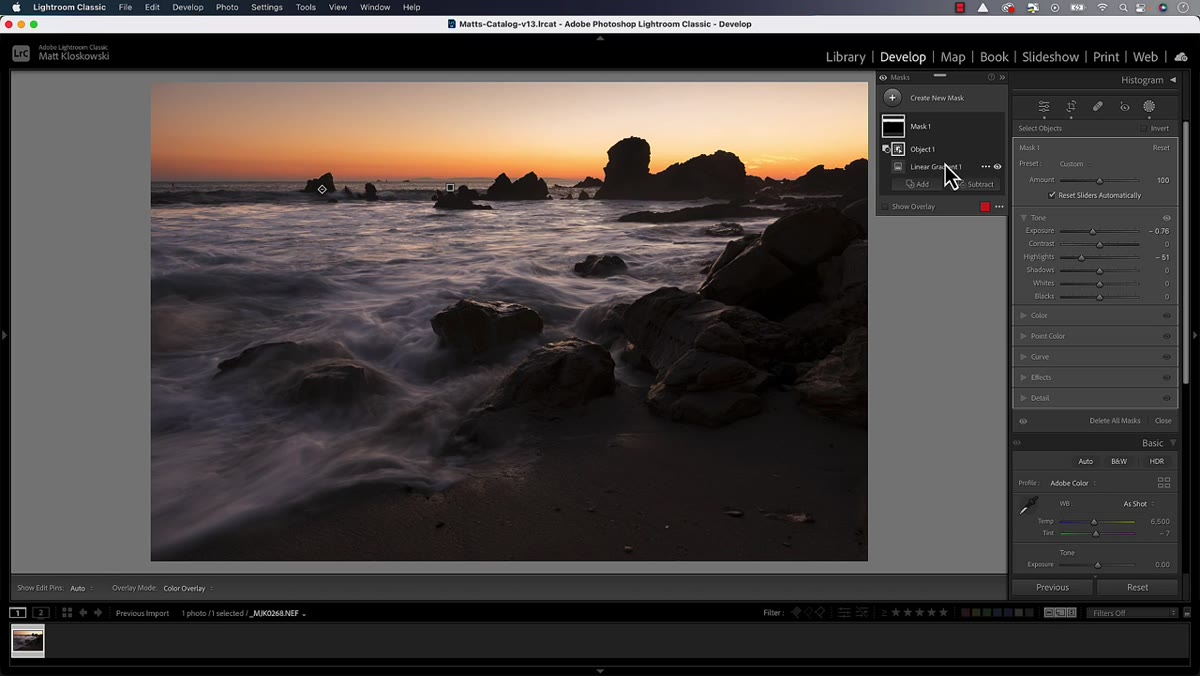 Basic panel sliders adjusted after masks are in place
Once the masks are doing the heavy lifting, you can go back to the Basic panel and make subtle global refinements. Small adjustments to overall contrast, white balance, or vibrance can unify the image after the zonal work is done. These global tweaks feel different now because you’re not asking them to solve a structural problem. They’re finishing touches, not fixes.
Basic panel sliders adjusted after masks are in place
Once the masks are doing the heavy lifting, you can go back to the Basic panel and make subtle global refinements. Small adjustments to overall contrast, white balance, or vibrance can unify the image after the zonal work is done. These global tweaks feel different now because you’re not asking them to solve a structural problem. They’re finishing touches, not fixes.
A Note from My Own Workflow
I’ve been making the “select sky first” mistake for longer than I’d like to admit, and it wasn’t until I started treating masked zones as the primary edit structure that my high-contrast images stopped looking processed. The linear gradient approach for skies is something I now use as a default starting point, and I adjust from there. One thing I’d add beyond what Matt covers: after finishing your masks, zoom in to 100% and check the transition zone right at the horizon. That’s where any edge artifact will hide. If something looks off there, a small feather adjustment on the gradient mask usually solves it cleanly.
There’s also a patience element to editing this way. Layering masks and building adjustments zone by zone takes longer than throwing the basic panel sliders around. But it’s the same patience that gets you to a location at 4am to catch light that lasts eight minutes. The time investment at the editing desk is just the second half of the same commitment.
The single most important idea in this tutorial is that images with wide dynamic range require zonal editing, not global editing. Build your masks first, treat each zone independently, and use the basic panel to refine rather than rescue.
Watch the full tutorial on YouTube to see Matt’s exact slider values and the before/after result on the finished image.
Comments
Leave a Comment