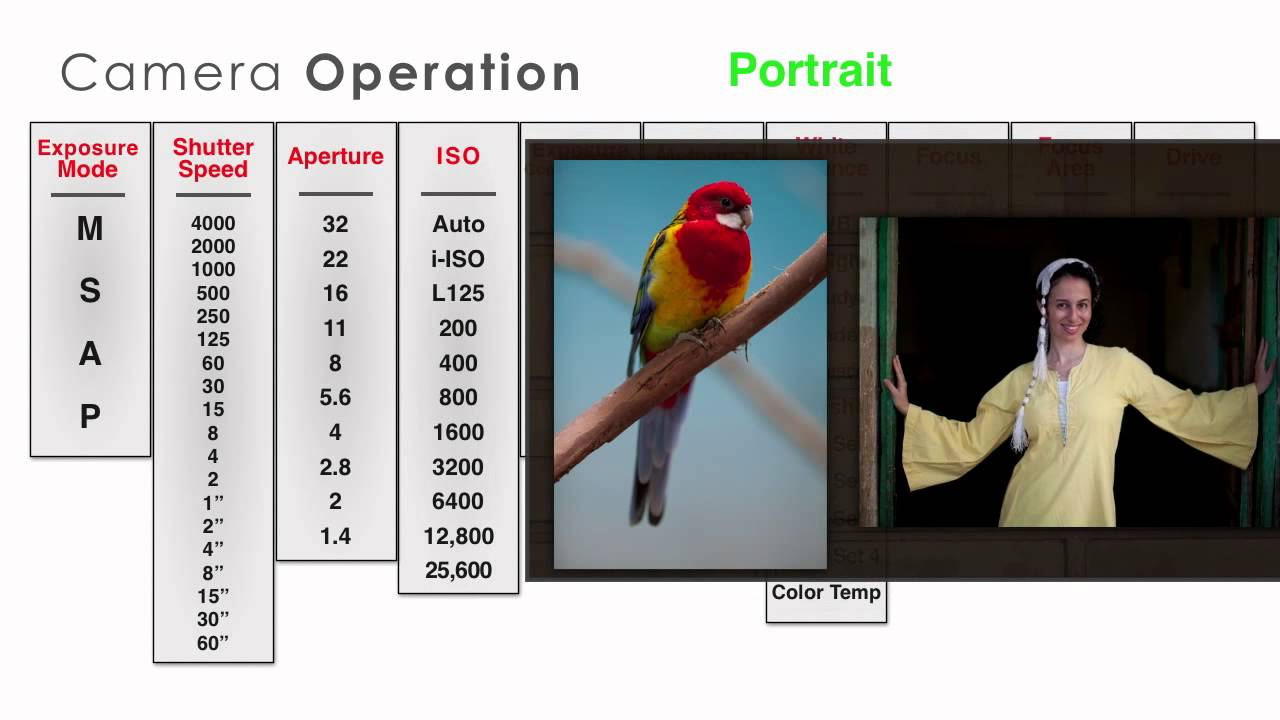
There’s a particular kind of frustration that comes from standing in front of a stunning scene, knowing the light is right, and fumbling with your camera settings while the moment slips away. After twenty years of pre-dawn drives and frozen fingers, I still think the fastest path to consistent images is having a clear, repeatable settings framework before you ever raise the camera to your eye. Not because creativity should be mechanical, but because when the technical side is locked in, your mind is free to actually see.
I recently watched a CreativeLive tutorial on setting up the Panasonic GH3 for both landscape and portrait work, and while the specific camera body may differ from what you shoot with, the logic behind every decision transfers directly to almost any system. Watch the full tutorial on YouTube and follow along with the breakdown below. What struck me about this tutorial is how clearly it separates the two shooting scenarios, because they really do demand opposite priorities, and conflating them is where a lot of photographers get into trouble.
The instructor treats each scenario as its own problem to solve. Landscapes ask for maximum sharpness across a wide depth of field, with stability and patience as the tools. Portraits ask for subject isolation, speed, and flexibility. Getting those priorities backwards will cost you the shot. Here is how to get them right.
Step 1: Choose Manual Exposure Mode for Both Scenarios
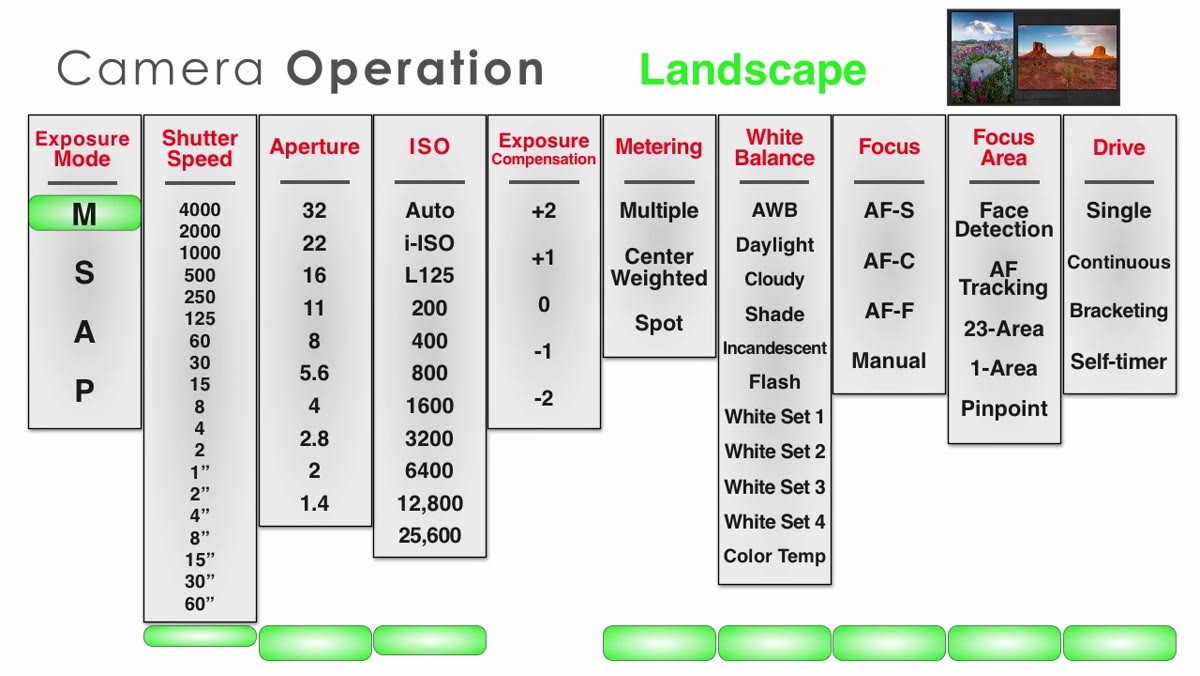 Instructor explaining manual mode selection on GH3
For landscape work, manual exposure is not a preference, it is the correct tool. When you are on a tripod with nothing moving in the frame, you have time to be deliberate. Manual mode lets you lock in exact shutter speed and aperture values without the camera second-guessing you when the light shifts slightly between frames. The instructor makes this point clearly: if you want precision, you have to own every variable. For portrait work, manual still applies, but the reasoning shifts toward keeping your exposure consistent across a rapid sequence of shots where the subject is moving.
Instructor explaining manual mode selection on GH3
For landscape work, manual exposure is not a preference, it is the correct tool. When you are on a tripod with nothing moving in the frame, you have time to be deliberate. Manual mode lets you lock in exact shutter speed and aperture values without the camera second-guessing you when the light shifts slightly between frames. The instructor makes this point clearly: if you want precision, you have to own every variable. For portrait work, manual still applies, but the reasoning shifts toward keeping your exposure consistent across a rapid sequence of shots where the subject is moving.
I refuse to use auto mode on anything I shoot seriously, and this tutorial reinforced why. Auto modes are designed for average situations. Your job as a photographer is to recognize when you are not in an average situation.
Step 2: Set ISO to Its Lowest Native Value
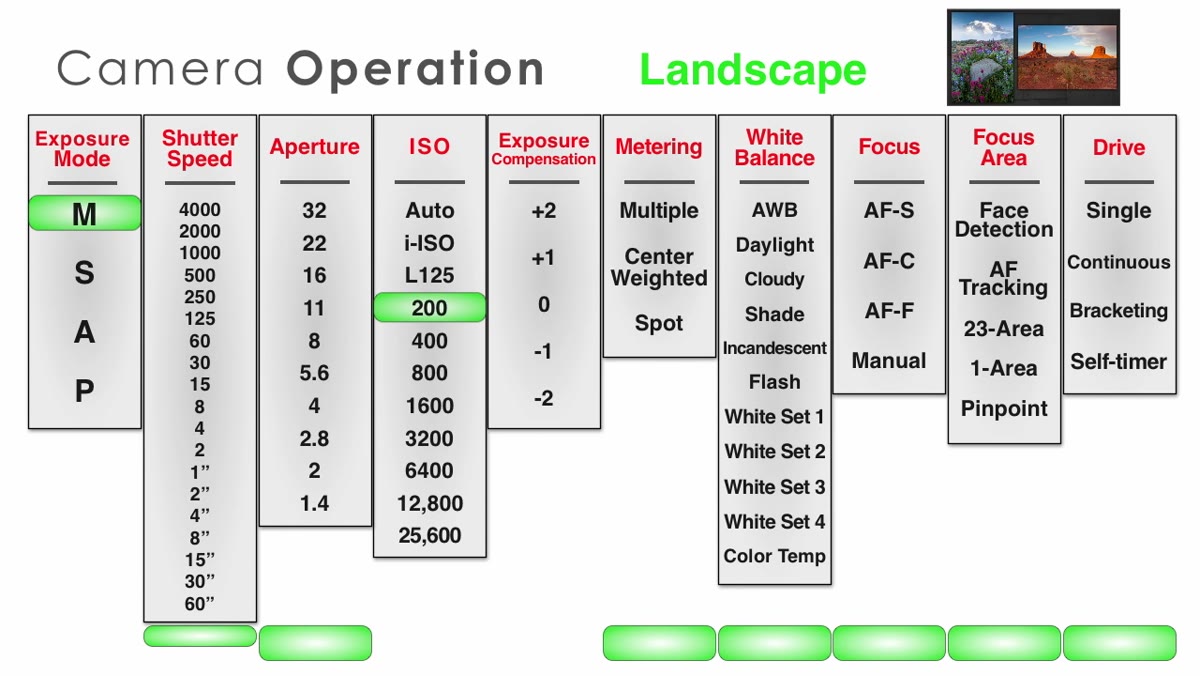 Camera menu showing ISO set to 200
The GH3’s lowest native ISO is 200, and for landscape work, this is where you start every single time. Lower ISO means less digital noise and the cleanest possible file from the sensor. When you have good light and a tripod, there is no reason to compromise image quality by pushing sensitivity higher. The instructor is explicit: ISO 200 gives you the best output the sensor can produce under favorable conditions.
Camera menu showing ISO set to 200
The GH3’s lowest native ISO is 200, and for landscape work, this is where you start every single time. Lower ISO means less digital noise and the cleanest possible file from the sensor. When you have good light and a tripod, there is no reason to compromise image quality by pushing sensitivity higher. The instructor is explicit: ISO 200 gives you the best output the sensor can produce under favorable conditions.
For portrait shooting, the logic is the same, but with one practical exception. If your lighting conditions force a faster shutter speed to freeze subject movement, and you cannot get there at ISO 200 with a reasonable aperture, then you move ISO up as a last resort. Start low, push only when you must.
Step 3: Dial In Aperture Based on Your Depth of Field Goal
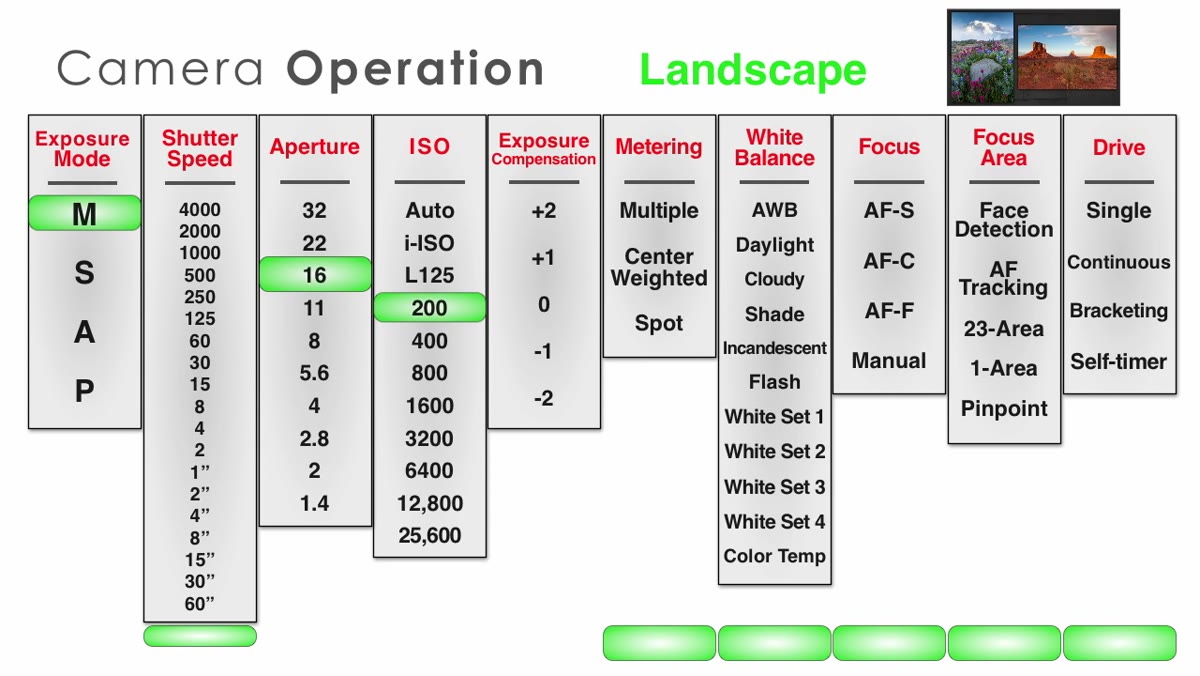 Instructor discussing aperture values for landscape depth of field
This is where the two scenarios split hard. For landscapes, you want maximum depth of field. The instructor walks through a practical range: f/8, f/11, f/16, f/22. The right choice depends on your specific lens and the distance to your nearest foreground element, but f/16 is a reliable starting point if you need front-to-back sharpness. Keep in mind that very small apertures can introduce diffraction softness on some lenses, so f/11 is often the sweet spot worth testing on your own glass.
Instructor discussing aperture values for landscape depth of field
This is where the two scenarios split hard. For landscapes, you want maximum depth of field. The instructor walks through a practical range: f/8, f/11, f/16, f/22. The right choice depends on your specific lens and the distance to your nearest foreground element, but f/16 is a reliable starting point if you need front-to-back sharpness. Keep in mind that very small apertures can introduce diffraction softness on some lenses, so f/11 is often the sweet spot worth testing on your own glass.
For portraits, the goal reverses. You want a shallow depth of field to separate your subject from the background. If your lens opens to f/1.4, use it. Anything in the f/1.4 to f/2.8 range gives you that soft, compressed background that makes environmental portraits feel intentional rather than accidental.
Step 4: Set Shutter Speed to Match the Scenario
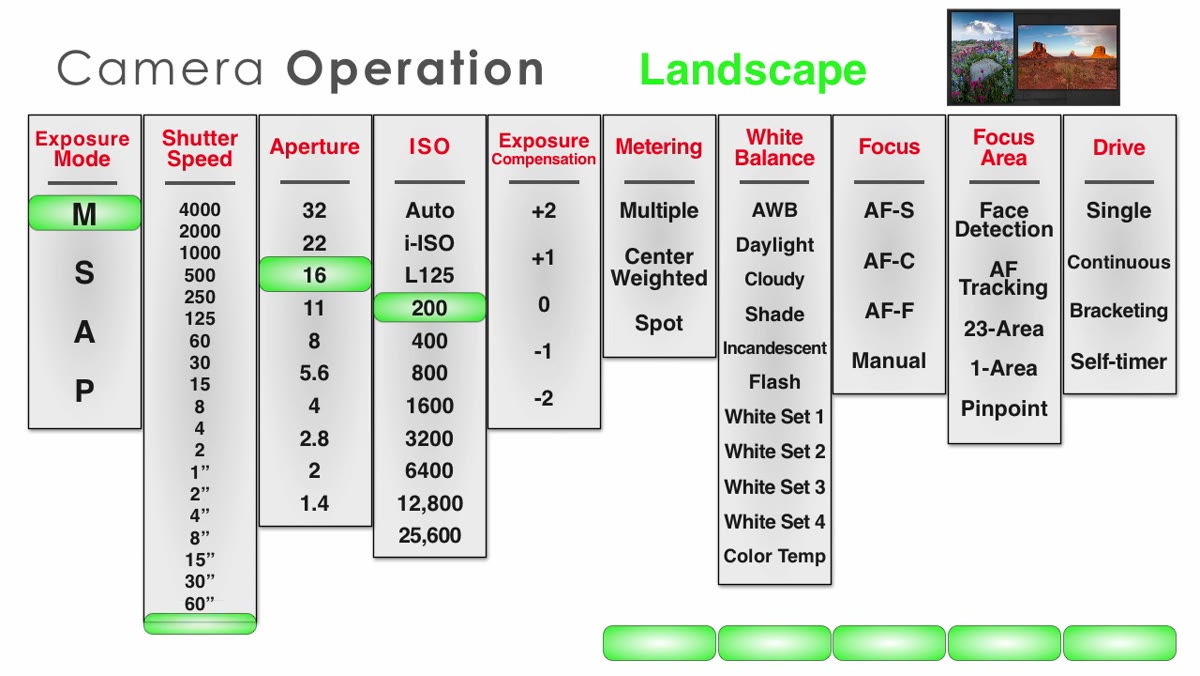 Instructor noting shutter speed is flexible when shooting on a tripod
On a tripod with a static landscape, shutter speed is largely irrelevant to sharpness, it will simply be whatever the correct exposure demands. At ISO 200 and f/16, that speed might be quite slow, which is fine. The tripod handles stability. For portraits, however, the instructor gives a practical floor: 1/125th of a second or faster. This accounts for both camera shake from handholding and the subtle movement of a subject who is breathing, blinking, or shifting weight. If your subject is more active, push the floor higher.
Instructor noting shutter speed is flexible when shooting on a tripod
On a tripod with a static landscape, shutter speed is largely irrelevant to sharpness, it will simply be whatever the correct exposure demands. At ISO 200 and f/16, that speed might be quite slow, which is fine. The tripod handles stability. For portraits, however, the instructor gives a practical floor: 1/125th of a second or faster. This accounts for both camera shake from handholding and the subtle movement of a subject who is breathing, blinking, or shifting weight. If your subject is more active, push the floor higher.
Step 5: Configure Metering, White Balance, and Focus Mode
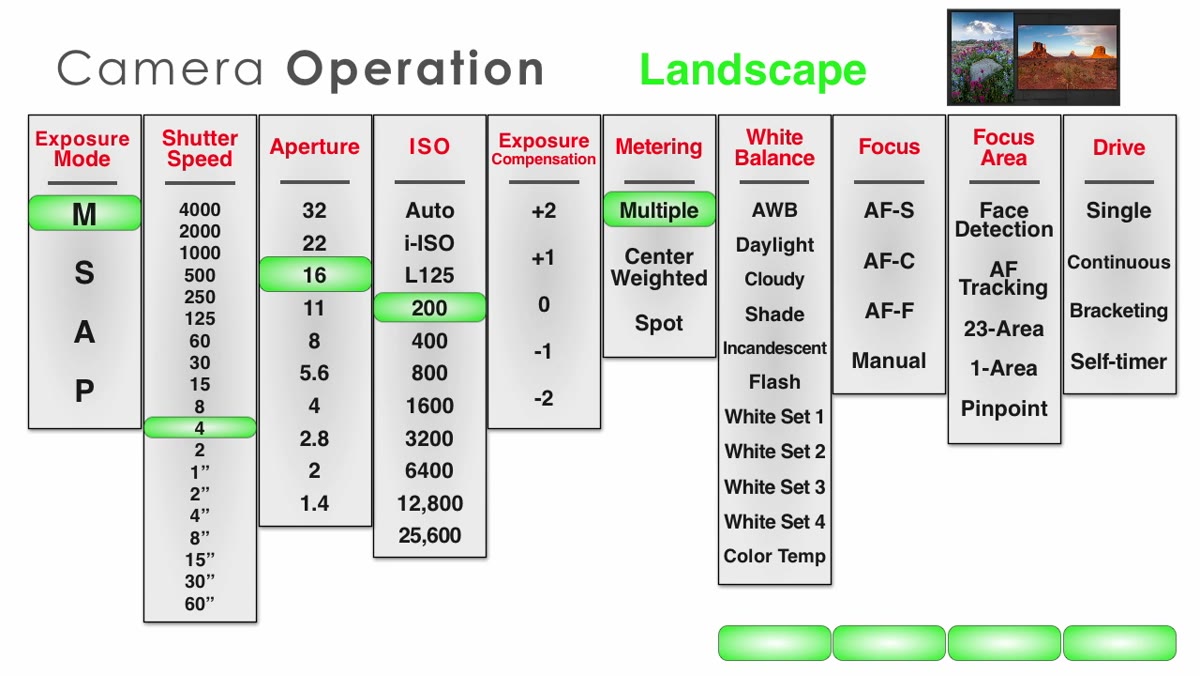 GH3 metering and white balance menu settings shown
The instructor keeps these settings straightforward, and I think that is the right call. Multi-zone metering handles most landscape and portrait situations well without requiring manual intervention. Auto white balance works as a starting point in both scenarios, with the understanding that you will correct it in post if the scene calls for it. For landscapes, single autofocus mode (AFS) is ideal since nothing in the scene is moving. Pinpoint focus area gives you precise control over exactly where in the frame the camera locks focus, which matters when you have a specific foreground rock or texture you want tack sharp.
GH3 metering and white balance menu settings shown
The instructor keeps these settings straightforward, and I think that is the right call. Multi-zone metering handles most landscape and portrait situations well without requiring manual intervention. Auto white balance works as a starting point in both scenarios, with the understanding that you will correct it in post if the scene calls for it. For landscapes, single autofocus mode (AFS) is ideal since nothing in the scene is moving. Pinpoint focus area gives you precise control over exactly where in the frame the camera locks focus, which matters when you have a specific foreground rock or texture you want tack sharp.
For portraits with a stationary subject, AFS still works well. Lock focus on the subject’s eye, hold the shutter halfway, recompose if needed, then shoot. If your subject might drift or turn, AF continuous mode is worth considering, though the instructor notes it will refocus if you recompose, which can work against you.
Step 6: Select Drive Mode to Fit the Situation
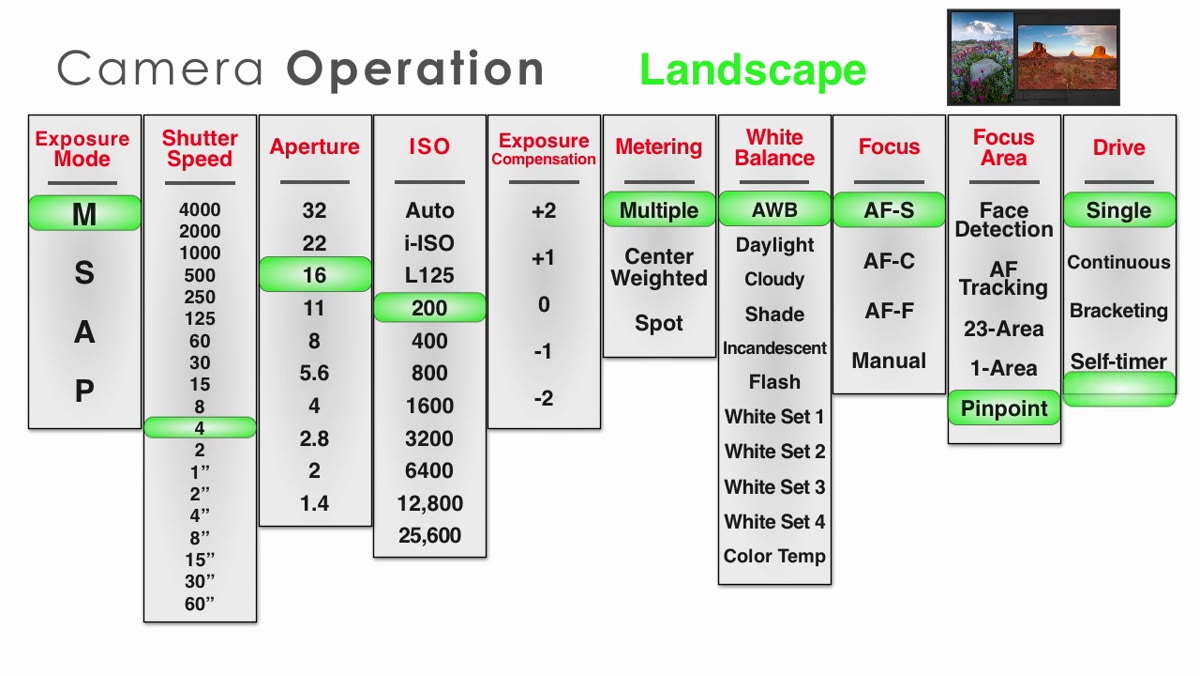 Drive mode settings for landscape and portrait shooting
For landscapes on a tripod, the instructor recommends either a cable release with single-shot drive mode, or the 2-second self-timer if you do not have a cable release with you. Both options prevent camera shake from the act of pressing the shutter button, which matters more than most people expect at slower shutter speeds. For portraits, continuous drive mode at 4 to 6 frames per second is the right call. Facial expressions and gestures change in fractions of a second, and having a burst to choose from dramatically improves your keeper rate.
Drive mode settings for landscape and portrait shooting
For landscapes on a tripod, the instructor recommends either a cable release with single-shot drive mode, or the 2-second self-timer if you do not have a cable release with you. Both options prevent camera shake from the act of pressing the shutter button, which matters more than most people expect at slower shutter speeds. For portraits, continuous drive mode at 4 to 6 frames per second is the right call. Facial expressions and gestures change in fractions of a second, and having a burst to choose from dramatically improves your keeper rate.
What I’d Add from the Field
The tutorial does not mention hyperfocal distance, and for serious landscape work, it is worth understanding. Rather than simply stopping down to f/16 and hoping for the best, finding the hyperfocal distance for your specific focal length and aperture tells you exactly where to focus to get the maximum depth of field in your frame. There are free apps that do this math instantly. Combine that with the pinpoint focus area the instructor recommends, and you are working with real precision rather than approximation.
I would also add that the 2-second self-timer the instructor mentions is genuinely underrated. I have shot in conditions where I forgot my cable release, used the self-timer, and produced images that were indistinguishable from those shot with a release. It costs you nothing and eliminates a real source of blur.
The single most important takeaway here is that landscapes and portraits are not just different subjects, they are different technical problems with opposing solutions. Internalizing that distinction, and building separate settings frameworks for each, is what separates photographers who get consistent results from those who get lucky occasionally.
Watch the full tutorial on YouTube to see the instructor walk through the GH3 menus in real time. Even if you are not shooting that specific body, the reasoning behind each setting is worth your full attention.
Comments (1)
This is going in my reference folder. Incredibly useful.
Leave a Comment