I’ve spent twenty years chasing light before most people set an alarm, and I can tell you that sharpness is one of those qualities that separates a photo that stops someone mid-scroll from one that just gets a polite nod. Camera technology has improved dramatically. The files coming out of modern sensors are already reasonably crisp, detailed, and full of tonal information. But the sharpness you capture in the field and the sharpness you draw out in post-processing are two different conversations entirely, and knowing how to have the second one is what turns a good raw file into a print someone wants to hang on their wall.
What tripped me up for years was treating sharpening as a single move. Crank a slider, call it done. It wasn’t until I started thinking about sharpening as something that has to match the scale of the detail in the scene that my edits started feeling intentional. In Watch the full tutorial on YouTube, Mark Denney lays out five distinct approaches for sharpening landscape images inside Lightroom, each targeting a different tier of detail from the finest textures up to large structural elements. It’s a genuinely useful breakdown, and I want to walk through it here with the kind of practical notes that help when you’re actually sitting at a screen with your own files.
One thing Denney points out early that reframed how I think about all of this: there is no such thing as actually sharpening a pixel. What sharpening tools do is apply micro-contrast along edges, making transitions between tones more defined and creating the perception of sharpness. That’s not a limitation. It’s just the honest mechanical reality of the process, and understanding it helps you make smarter decisions at every slider.
Step 1: Navigate to the Detail Panel and Zoom In First
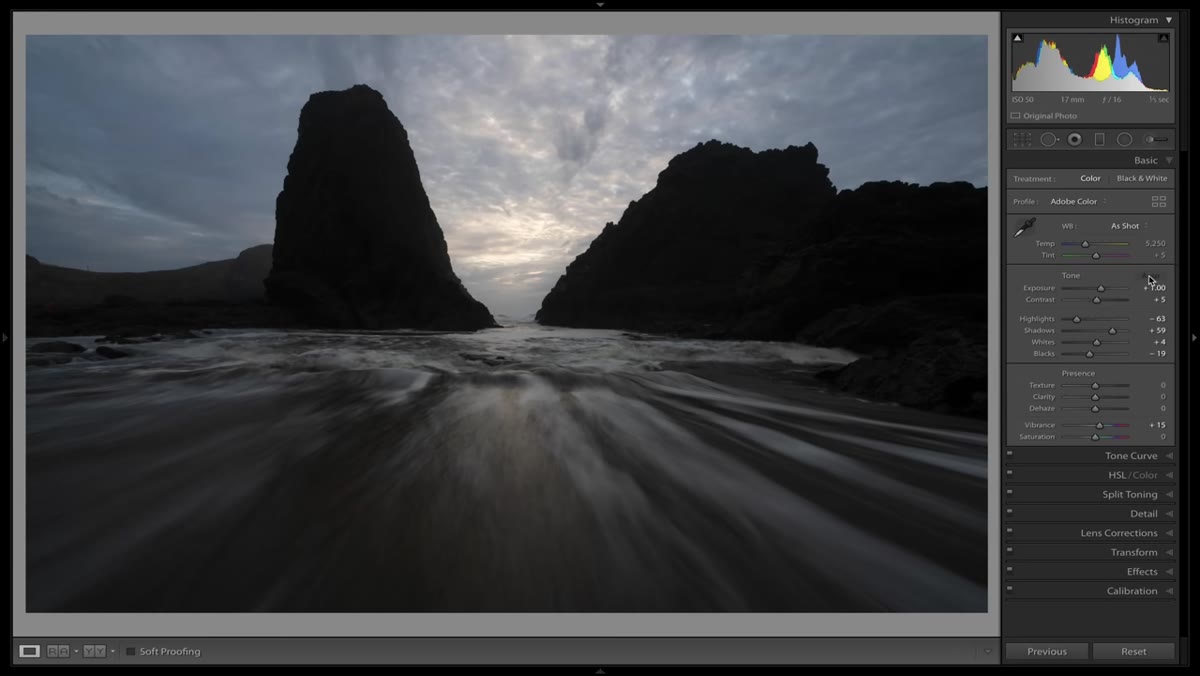 Detail panel open with sharpening sliders visible
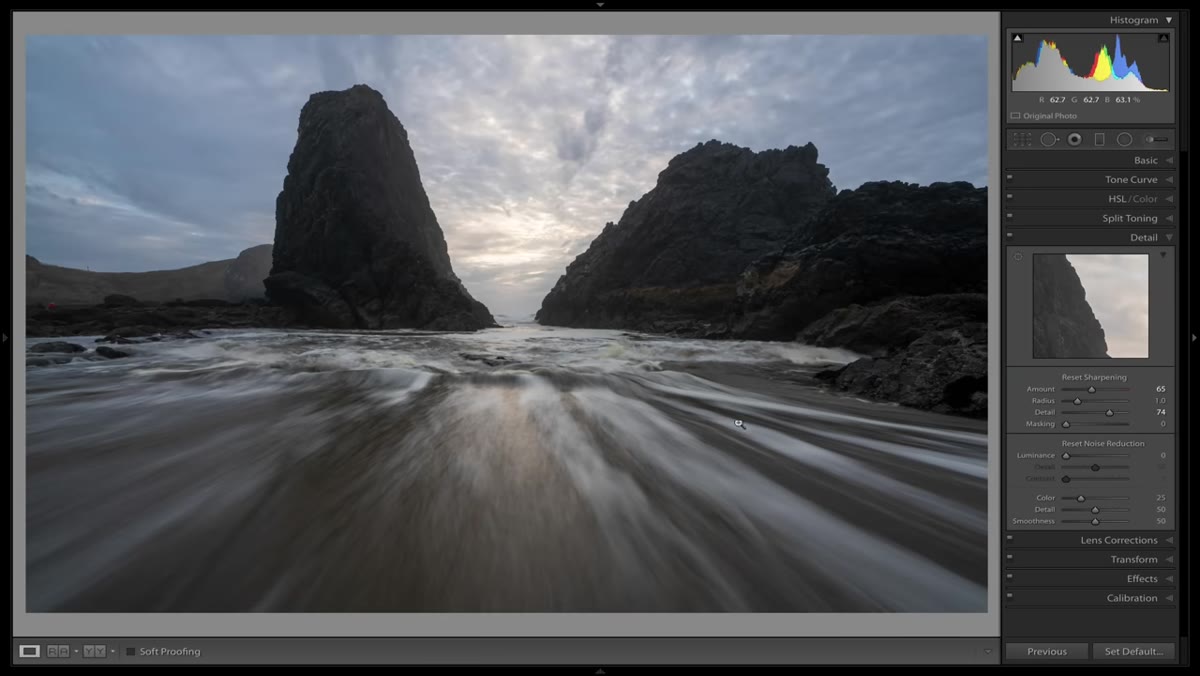
Before touching anything, zoom into the image at 100 percent or higher, and position your view on an edge-heavy area of the scene, something like a ridgeline, a rocky shoreline, or the silhouette of a tree against sky. Sharpening changes are subtle and you will not see them accurately at a zoomed-out view. The Detail panel in Lightroom’s Develop module houses four sharpening sliders: Amount, Radius, Detail, and Masking. Each one controls a different aspect of how the sharpening is applied.
Detail panel open with sharpening sliders visible
Before touching anything, zoom into the image at 100 percent or higher, and position your view on an edge-heavy area of the scene, something like a ridgeline, a rocky shoreline, or the silhouette of a tree against sky. Sharpening changes are subtle and you will not see them accurately at a zoomed-out view. The Detail panel in Lightroom’s Develop module houses four sharpening sliders: Amount, Radius, Detail, and Masking. Each one controls a different aspect of how the sharpening is applied.
Step 2: Set the Amount and Radius Sliders
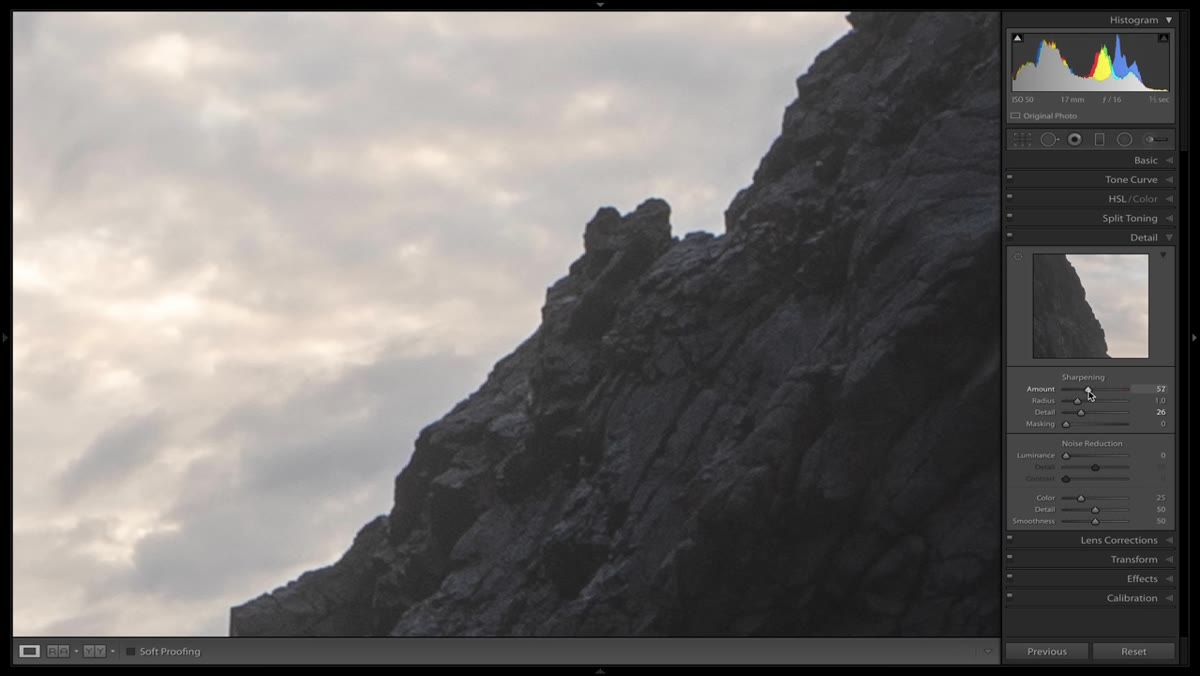 Amount slider being adjusted, zoomed view of rocky coastline
The Amount slider controls how much sharpening is applied overall. Denney works in the mid-50s to mid-60s range for most landscape files, and that lines up with where I tend to land as well. Going too high introduces edge halos that look artificial, especially in areas of smooth gradation like sky. The Radius slider controls how many pixels out from each edge the sharpening effect extends. A radius around 0.8 to 1.3 covers most landscape scenarios well. Denney tends to leave this close to 1.0 and not fiddle with it much, which is sound advice since the Detail and Masking sliders do more of the nuanced work anyway.
Amount slider being adjusted, zoomed view of rocky coastline
The Amount slider controls how much sharpening is applied overall. Denney works in the mid-50s to mid-60s range for most landscape files, and that lines up with where I tend to land as well. Going too high introduces edge halos that look artificial, especially in areas of smooth gradation like sky. The Radius slider controls how many pixels out from each edge the sharpening effect extends. A radius around 0.8 to 1.3 covers most landscape scenarios well. Denney tends to leave this close to 1.0 and not fiddle with it much, which is sound advice since the Detail and Masking sliders do more of the nuanced work anyway.
Step 3: Raise the Detail Slider for Texture-Rich Scenes
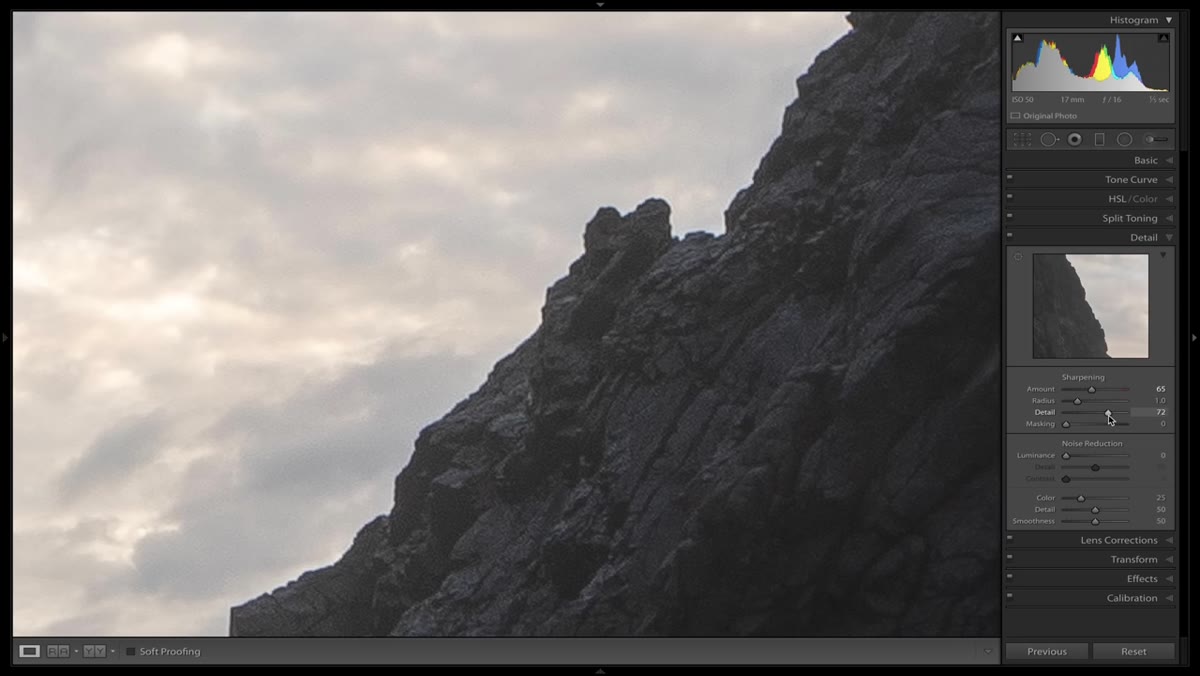 Detail slider raised, texture in foreground rocks becoming more defined
The Detail slider determines how much of the fine texture within the image gets pulled into the sharpening calculation. At lower values, only the strongest edges get sharpened. As you push it toward the mid-60s to mid-70s range, finer surface textures start to pick up sharpening too. For landscape work, where you often want to emphasize the grain of sandstone, the roughness of bark, or the individual blades of grass in a foreground, raising Detail makes sense. The trade-off is that noise becomes more visible at higher values, so this slider and your noise reduction settings have to be balanced against each other.
Detail slider raised, texture in foreground rocks becoming more defined
The Detail slider determines how much of the fine texture within the image gets pulled into the sharpening calculation. At lower values, only the strongest edges get sharpened. As you push it toward the mid-60s to mid-70s range, finer surface textures start to pick up sharpening too. For landscape work, where you often want to emphasize the grain of sandstone, the roughness of bark, or the individual blades of grass in a foreground, raising Detail makes sense. The trade-off is that noise becomes more visible at higher values, so this slider and your noise reduction settings have to be balanced against each other.
Step 4: Use the Masking Slider to Protect Smooth Areas
 Masking overlay visible, black and white edge mask displayed
This is the slider that changed how I use the Detail panel. Hold Option on Mac (Alt on PC) while dragging the Masking slider and Lightroom shows you a black-and-white overlay. White areas will receive the sharpening. Black areas will not. At zero, everything is white, meaning the sharpening is applied uniformly across the entire image, including sky, water, and any smooth tonal transitions where sharpening usually does more harm than good. As you drag right, the black regions grow and the sharpening becomes increasingly targeted to only the most defined edges in the scene. For a typical coastal landscape with a complex foreground and an open sky, pulling Masking into the 40-70 range keeps the sharpening where it belongs and out of the areas where it introduces noise or artifacting.
Masking overlay visible, black and white edge mask displayed
This is the slider that changed how I use the Detail panel. Hold Option on Mac (Alt on PC) while dragging the Masking slider and Lightroom shows you a black-and-white overlay. White areas will receive the sharpening. Black areas will not. At zero, everything is white, meaning the sharpening is applied uniformly across the entire image, including sky, water, and any smooth tonal transitions where sharpening usually does more harm than good. As you drag right, the black regions grow and the sharpening becomes increasingly targeted to only the most defined edges in the scene. For a typical coastal landscape with a complex foreground and an open sky, pulling Masking into the 40-70 range keeps the sharpening where it belongs and out of the areas where it introduces noise or artifacting.
Step 5: Use Texture for Medium-Scale Detail
 Texture slider in Basic or Presence panel being adjusted
The Texture slider, found in the Presence section of the Basic panel, targets a different scale of detail than the sharpening tools do. Where the Detail panel is working at the finest pixel-level edges, Texture operates on mid-scale surface information, the kind of three-dimensional quality in a rocky foreground, a weathered fence post, or the surface of moving water. It enhances without creating the harsh halos that sharpening can produce at higher values. Increasing Texture tends to make landscape images feel more tangible, more physically present. It’s become one of my most-used tools for foreground elements specifically.
Texture slider in Basic or Presence panel being adjusted
The Texture slider, found in the Presence section of the Basic panel, targets a different scale of detail than the sharpening tools do. Where the Detail panel is working at the finest pixel-level edges, Texture operates on mid-scale surface information, the kind of three-dimensional quality in a rocky foreground, a weathered fence post, or the surface of moving water. It enhances without creating the harsh halos that sharpening can produce at higher values. Increasing Texture tends to make landscape images feel more tangible, more physically present. It’s become one of my most-used tools for foreground elements specifically.
Step 6: Apply Clarity for Large Structural Contrast
 Clarity slider being moved, midtone contrast increasing in full scene
Clarity works at an even larger scale than Texture. It increases contrast in the midtones, which emphasizes the structural edges of large subjects: mountain profiles, dramatic cloud formations, the mass of a coastal rock stack. A moderate Clarity boost can make an image feel more powerful without the viewer being able to pinpoint exactly why. Too much and the effect becomes obvious and gritty in a way that rarely serves a natural landscape. I keep it between 10 and 25 for most files, and I’ll occasionally use a graduated or radial mask to apply it only to specific zones of the frame.
Clarity slider being moved, midtone contrast increasing in full scene
Clarity works at an even larger scale than Texture. It increases contrast in the midtones, which emphasizes the structural edges of large subjects: mountain profiles, dramatic cloud formations, the mass of a coastal rock stack. A moderate Clarity boost can make an image feel more powerful without the viewer being able to pinpoint exactly why. Too much and the effect becomes obvious and gritty in a way that rarely serves a natural landscape. I keep it between 10 and 25 for most files, and I’ll occasionally use a graduated or radial mask to apply it only to specific zones of the frame.
A Field Note on Sharpening Order and Sequence
One thing I’d add from my own editing practice is that the sequence in which you apply these tools matters more than most tutorials acknowledge. I always deal with noise reduction before any sharpening, because sharpening amplifies whatever texture exists in the file, and in a high-ISO file that means amplifying noise alongside real detail. Get the file clean first, then sharpen. I also make a habit of toggling each adjustment on and off before moving to the next tool, just to confirm I’m hearing what it’s doing rather than stacking changes blindly. Twenty years of editing has taught me that the edits you can’t see individually are the ones most likely to compound into something that looks overworked.
Sharpening in Lightroom is not one decision. It’s a layered conversation with your image across different scales of detail, from the finest surface textures all the way up to the broad structural presence of a scene. The Detail panel handles the smallest levels. Texture takes the middle ground. Clarity works on the large shapes. Used together and used with restraint, these tools can bring out what was always in the file waiting to be found.
Watch the full tutorial on YouTube to see Mark Denney demonstrate each step on a real Oregon Coast image with before-and-after comparisons throughout.
Comments
Leave a Comment