There’s a particular kind of paralysis that hits you when the landscape is almost too big. You’ve hiked in, the light is doing something extraordinary, and you’re standing there rotating slowly with your camera raised, trying to stuff a 180-degree panorama into a single frame. I’ve been doing this for twenty years and it still gets me. The shot that usually comes out of that moment is technically fine and emotionally empty, because when a viewer doesn’t know where to look, they don’t feel anything.
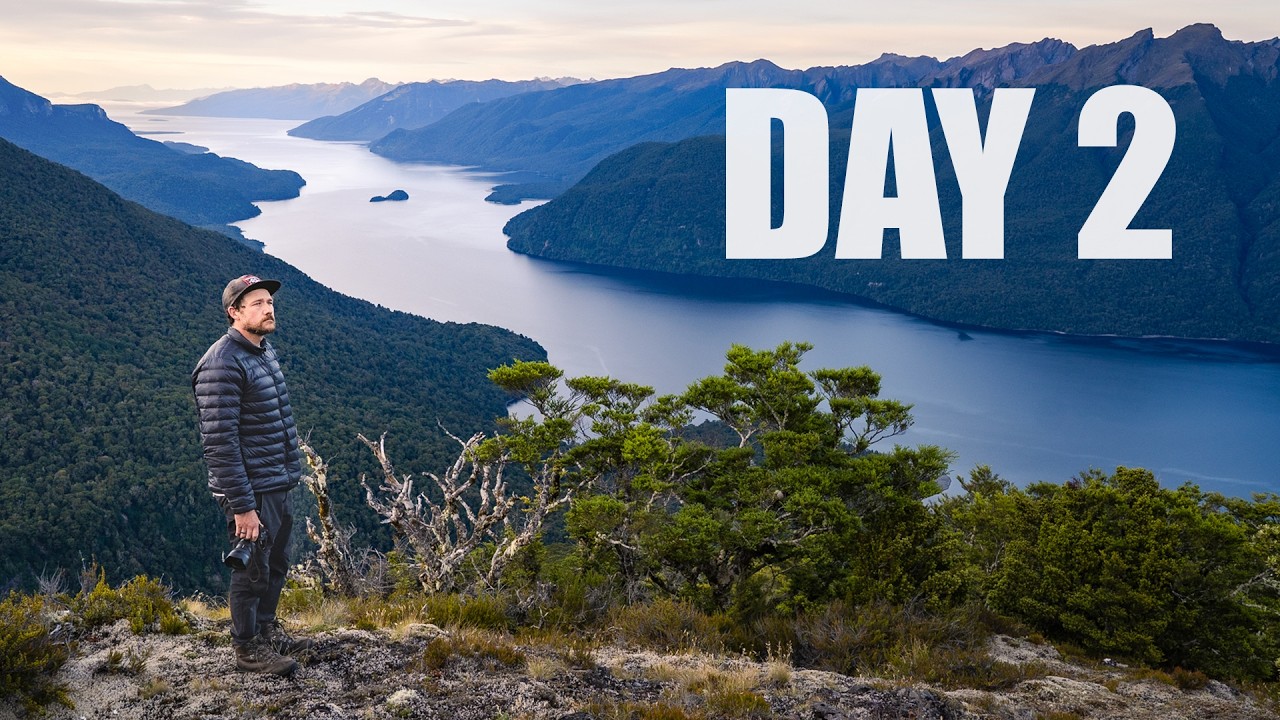
In this William Patino tutorial, filmed during a wilderness sunrise above Lake Te Anau in New Zealand’s Fiordland, Will works through exactly that problem in real time. He’s not in a studio explaining theory. He’s on a hillside in low light, waiting on clouds, swapping lenses, making decisions out loud. That’s what makes it worth your time. Watch the full tutorial on YouTube and then come back to this breakdown if you want the technique pulled apart step by step.
The core lesson here isn’t about a specific setting or a filter. It’s about restraint. About deciding what the photograph is actually of, and then building everything else to serve that decision. Here’s how Will works through it.
Step 1: Scout With Your Eyes Before You Raise the Camera
 Photographer walking uphill toward a mountain viewpoint at dawn
Will mentions early in the video that a specific angle on the mountain caught his eye the previous day during the hike. He isn’t arriving cold and hoping for the best. He’s walking toward a shot he’s already half-composed mentally. This is the part of landscape photography that doesn’t photograph well, so nobody talks about it enough. When you arrive at a location, especially somewhere with multiple competing elements like a lake, mountain ranges, and foreground vegetation, walk the area first. Note what has potential. Come back to it when the light does what you need.
Photographer walking uphill toward a mountain viewpoint at dawn
Will mentions early in the video that a specific angle on the mountain caught his eye the previous day during the hike. He isn’t arriving cold and hoping for the best. He’s walking toward a shot he’s already half-composed mentally. This is the part of landscape photography that doesn’t photograph well, so nobody talks about it enough. When you arrive at a location, especially somewhere with multiple competing elements like a lake, mountain ranges, and foreground vegetation, walk the area first. Note what has potential. Come back to it when the light does what you need.
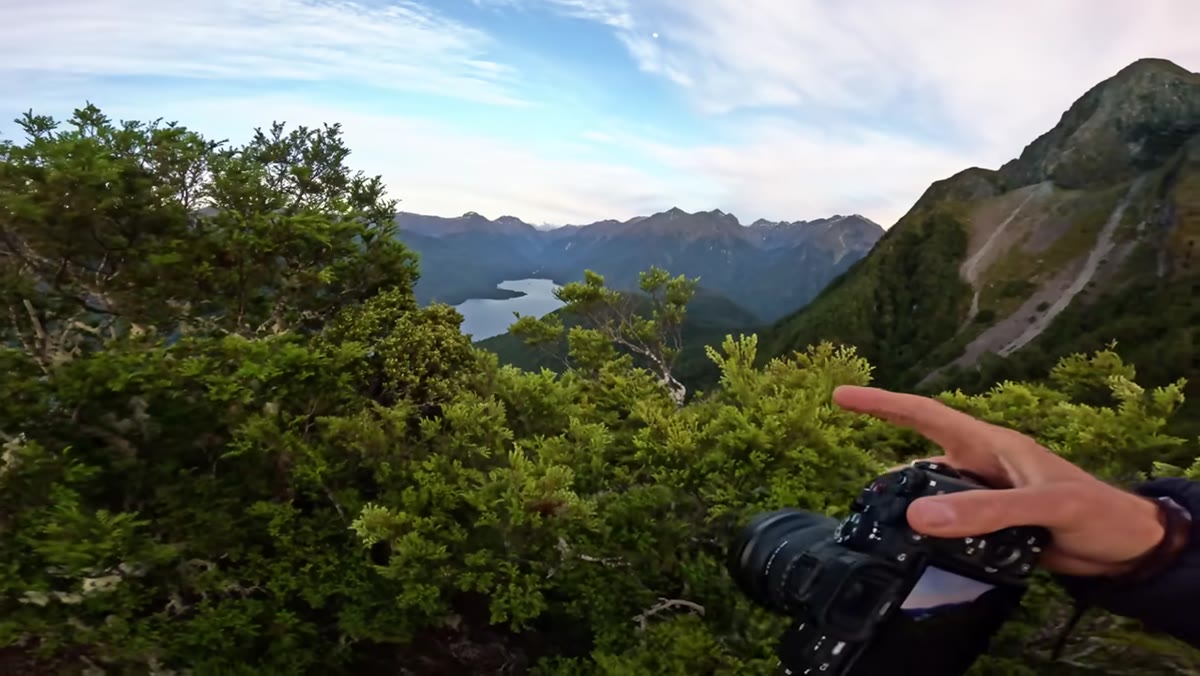
Step 2: Use Foreground Elements to Create Layering and Depth
 Camera positioned above beech trees with lake visible behind
Once Will is at his vantage point, he doesn’t immediately go wide. He looks for nearby beech trees to place in the foreground, describing the goal as getting layering into the frame rather than shooting only what’s far off in the distance. He positions himself slightly above the trees, which gives him a sliver of foreground, a mid-ground of lake, and the mountain behind. Three distinct planes of depth in one frame.
Camera positioned above beech trees with lake visible behind
Once Will is at his vantage point, he doesn’t immediately go wide. He looks for nearby beech trees to place in the foreground, describing the goal as getting layering into the frame rather than shooting only what’s far off in the distance. He positions himself slightly above the trees, which gives him a sliver of foreground, a mid-ground of lake, and the mountain behind. Three distinct planes of depth in one frame.
The practical move here is to get lower or higher until those planes separate cleanly. Don’t just stand at eye level and shoot. Move your feet. Even 30 centimeters of vertical adjustment changes how much sky, foreground, and background you’re balancing. Will also notes a natural gap through the trees that acts as a frame within a frame, pulling the eye toward the lake. When you find one of those, stop moving.
Step 3: Work What You Have While You Wait on the Light
 Overcast sky with color, foreground trees lit in warm green
The light during the early part of this shoot isn’t cooperating. High cloud is diffusing the sun, giving brief flashes of color but not the hard directional light Will wants on the mountain. His response is instructive: he keeps shooting anyway. He works the vibrant fresh greens on the beech trees, the colors already present in the cloud, the existing mood. He doesn’t pack up and wait.
Overcast sky with color, foreground trees lit in warm green
The light during the early part of this shoot isn’t cooperating. High cloud is diffusing the sun, giving brief flashes of color but not the hard directional light Will wants on the mountain. His response is instructive: he keeps shooting anyway. He works the vibrant fresh greens on the beech trees, the colors already present in the cloud, the existing mood. He doesn’t pack up and wait.
This is something a mentor told me early in my career that I didn’t really hear for years: the mountain doesn’t care about your schedule. You can’t force the light, but you can stay present and keep looking. Some of my strongest images have come from the thirty minutes before the main event I drove hours to see, because I was paying attention to what was actually in front of me instead of what I was hoping for.
Step 4: Check Separation Between Foreground Layers
 Photographer adjusting position to separate branch from water below
Will catches himself on a specific compositional mistake and talks through fixing it in real time. He’s found a strong branch to use as foreground framing, but from his current position, the branch overlaps with the water behind it. The two elements merge visually. His fix is to move higher until the branch is clearly separated from the water, sitting against a different tonal background.
Photographer adjusting position to separate branch from water below
Will catches himself on a specific compositional mistake and talks through fixing it in real time. He’s found a strong branch to use as foreground framing, but from his current position, the branch overlaps with the water behind it. The two elements merge visually. His fix is to move higher until the branch is clearly separated from the water, sitting against a different tonal background.
Separation is one of those things that’s easy to miss on a small LCD in the field. Train yourself to look at the edges of every element in your frame, not just the subject. If two objects share a similar tone and their edges touch, the viewer’s eye can’t distinguish them. A small shift in your position almost always solves it.
Step 5: Simplify by Excluding Competing Subjects
 Wide angle shot of mountain without lake in frame
This is the most important technique in the whole video. When Will finally turns to photograph the mountain directly, he deliberately excludes the lake, even though the lake is stunning and visible from the same spot. His reasoning is clear: including the lake pulls the eye sideways and creates visual conflict. The mountain is the subject. Everything in the frame should serve the mountain.
Wide angle shot of mountain without lake in frame
This is the most important technique in the whole video. When Will finally turns to photograph the mountain directly, he deliberately excludes the lake, even though the lake is stunning and visible from the same spot. His reasoning is clear: including the lake pulls the eye sideways and creates visual conflict. The mountain is the subject. Everything in the frame should serve the mountain.
He also mentions that when he tried a wider focal length, he could see another peak (Mount Worsley) entering the frame, and he chose to exclude it for the same reason. More elements does not mean more impact. Identify one subject and then ask, of everything else visible, what helps it and what fights it.
Step 6: Match Your Focal Length to Your Intent
 Lens being changed from mid-range back to wide angle
Will moves between focal lengths deliberately throughout the shoot, not randomly. He uses a mid-range lens when he’s working the layered lake-and-trees composition, because that compression helps stack the planes of depth. He switches to a wide angle when he wants to include the full sweep of the mountain and its surrounding terrain. He notes when a wider view introduces the second peak and causes that subject-conflict problem described above.
Lens being changed from mid-range back to wide angle
Will moves between focal lengths deliberately throughout the shoot, not randomly. He uses a mid-range lens when he’s working the layered lake-and-trees composition, because that compression helps stack the planes of depth. He switches to a wide angle when he wants to include the full sweep of the mountain and its surrounding terrain. He notes when a wider view introduces the second peak and causes that subject-conflict problem described above.
The practical takeaway is to decide what role each focal length plays before you start shooting. Wide angles exaggerate depth and foreground scale. Mid-range and longer lenses compress layers and isolate subjects. Neither is better; they serve different compositions. Don’t just zoom because things look small.
What I’d Add From My Own Experience
I’ve stood in similar positions, usually somewhere in the Oregon Cascades rather than Fiordland, watching a landscape that’s genuinely overwhelming in scale. The temptation to capture all of it is almost a survival instinct. But the images that have actually sold, the ones people respond to, are almost never the wide-everything shot. They’re the one that decided what it was about.
I still shoot film occasionally for exactly this reason. When you have twelve or twenty-four frames on a roll, you stop pressing the shutter hoping something will work. You stand there, you think, you commit. Digital removed that constraint, which is mostly good, but it also removed a kind of discipline that Will is demonstrating here through sheer craft rather than necessity.
The single most important thing Will demonstrates in this tutorial is that breaking down a grand landscape into a specific, deliberate composition is not a creative compromise. It’s the work. The emotion of being somewhere vast and wild doesn’t transfer automatically into a frame; you have to choose the piece of it that carries the feeling, and exclude everything that dilutes it.
Watch the full tutorial on YouTube and keep an eye out for Will’s 2027 New Zealand photography workshops at williampatino.com.
Comments
Leave a Comment