There’s a specific frustration I’ve felt on nearly every dawn shoot I’ve done in the high desert outside Bend: the scene in front of me holds about three times more tonal range than my sensor can capture in a single frame. The shadows under the juniper trees go pure black. The clouds blow out to white. My eye reads the whole thing effortlessly, but the camera has to pick a lane. For twenty years I’ve been chasing workarounds, and the combination of exposure bracketing and panorama stitching is the most honest solution I’ve found. It doesn’t fake the scene. It captures what was actually there.
Watch the full tutorial on YouTube
In this Sean Tucker tutorial, he walks through the exact workflow he used during a trip to Snowdonia in Wales, where he was shooting wide valley landscapes and wanted maximum resolution alongside maximum tonal information. His approach: shoot nine frames per composition, three columns of three bracketed exposures each, then merge everything in Lightroom using its HDR and panorama functions. What I appreciate about his method is that it treats HDR as a data-gathering tool rather than a stylistic effect. The goal is latitude in post, not the over-processed look that gave the technique a bad reputation.
Step 1: Set Up Your Nine-Frame Shooting Grid
 Camera in portrait orientation, diagram showing 3-column grid
Turn your camera to portrait orientation before you touch the tripod head. This is the part most people skip and then regret. Shooting vertical frames and stitching them into a horizontal panorama dramatically increases your final megapixel count because you’re pulling from more sensor area per column. Sean’s grid is three columns, left to center to right, with enough overlap between each column to give Lightroom something to work with during the stitch. For each of those three positions, he shoots a bracketed set of three exposures: two stops underexposed, correct exposure, and two stops overexposed. That’s where the nine frames come from. Set your camera to auto-bracketing, use a remote shutter or the self-timer to eliminate any vibration, and don’t touch the tripod between columns.
Camera in portrait orientation, diagram showing 3-column grid
Turn your camera to portrait orientation before you touch the tripod head. This is the part most people skip and then regret. Shooting vertical frames and stitching them into a horizontal panorama dramatically increases your final megapixel count because you’re pulling from more sensor area per column. Sean’s grid is three columns, left to center to right, with enough overlap between each column to give Lightroom something to work with during the stitch. For each of those three positions, he shoots a bracketed set of three exposures: two stops underexposed, correct exposure, and two stops overexposed. That’s where the nine frames come from. Set your camera to auto-bracketing, use a remote shutter or the self-timer to eliminate any vibration, and don’t touch the tripod between columns.
Step 2: Understand What Each Bracketed Frame Is Capturing
 Three bracketed frames shown side by side, dark/mid/bright
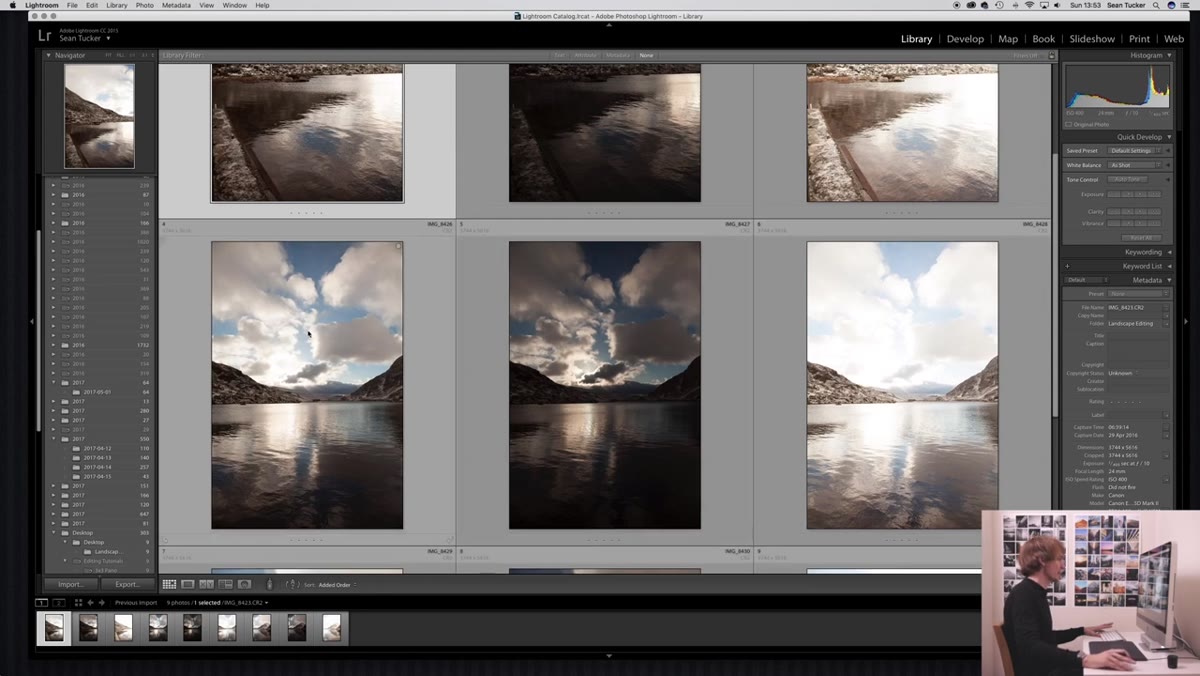
Before you sit down to edit, it helps to know exactly what job each exposure is doing. The overexposed frame is your shadow detail frame. When you lift it into an HDR merge, it’s bringing in information from the darkest parts of the scene that the correctly exposed image recorded as noise or near-black. The underexposed frame is your highlight frame. It holds cloud texture, bright sky gradients, and any specular detail that the middle exposure clipped to pure white. The middle exposure is your anchor. Think of the bracketed sequence not as three photos but as one image with extra memory built into the tonal extremes.
Three bracketed frames shown side by side, dark/mid/bright
Before you sit down to edit, it helps to know exactly what job each exposure is doing. The overexposed frame is your shadow detail frame. When you lift it into an HDR merge, it’s bringing in information from the darkest parts of the scene that the correctly exposed image recorded as noise or near-black. The underexposed frame is your highlight frame. It holds cloud texture, bright sky gradients, and any specular detail that the middle exposure clipped to pure white. The middle exposure is your anchor. Think of the bracketed sequence not as three photos but as one image with extra memory built into the tonal extremes.
Step 3: Select All Three Bracketed Frames and Merge to HDR in Lightroom
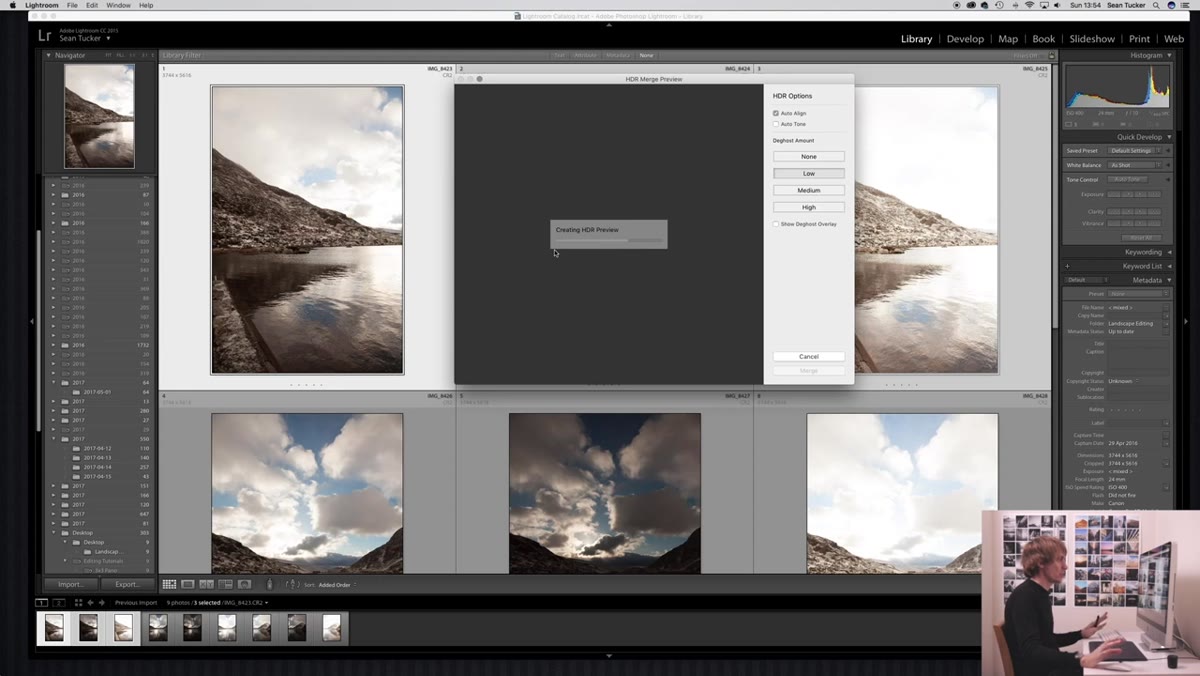
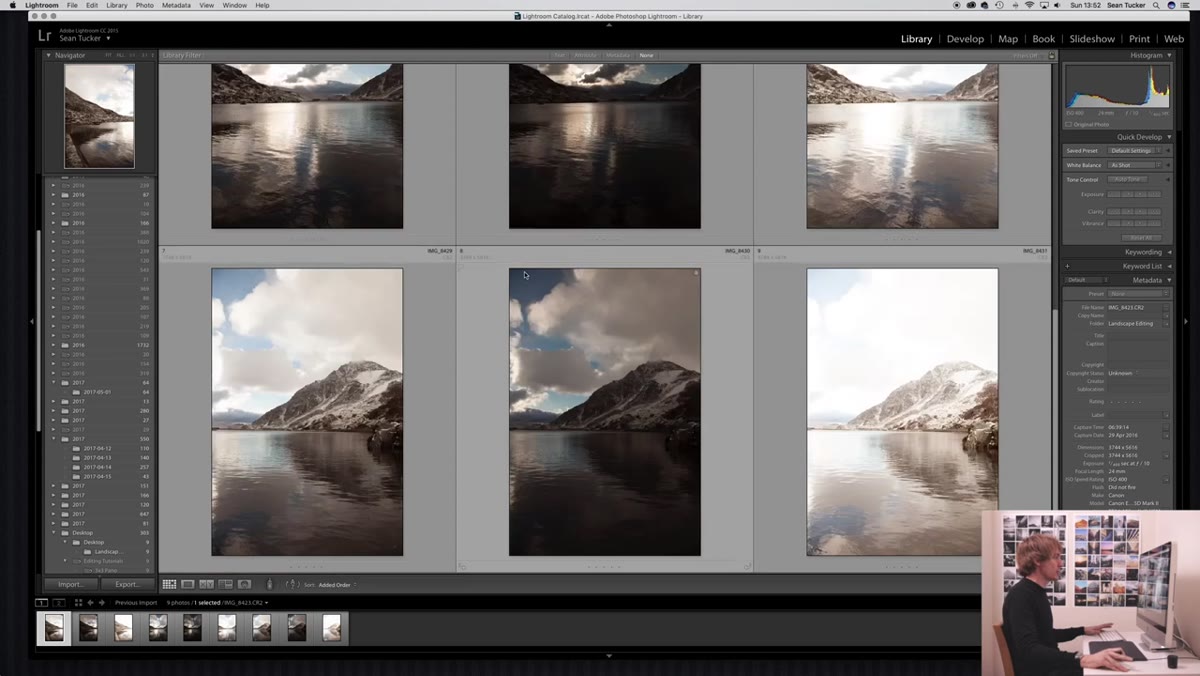 Lightroom grid with three bracketed frames selected, right-click menu open
In Lightroom’s grid view, select your three bracketed exposures for a single column position. Right-click and navigate to Photo Merge, then HDR. The dialog that appears has a few options, and the one Sean flags as critical is Auto Tone. Turn it off. The Auto Tone setting applies its own interpretation of how the merged image should look, and that interpretation tends to be heavy-handed. It’s what produces the characteristic HDR grimace: halos around ridgelines, pumped midtones, that plasticky hyper-real quality. With Auto Tone off, Lightroom simply stacks the tonal information from all three frames and hands you a flat, neutral DNG file with an enormous amount of recoverable data sitting in the highlights and shadows. That’s what you want. You’ll do the toning yourself.
Lightroom grid with three bracketed frames selected, right-click menu open
In Lightroom’s grid view, select your three bracketed exposures for a single column position. Right-click and navigate to Photo Merge, then HDR. The dialog that appears has a few options, and the one Sean flags as critical is Auto Tone. Turn it off. The Auto Tone setting applies its own interpretation of how the merged image should look, and that interpretation tends to be heavy-handed. It’s what produces the characteristic HDR grimace: halos around ridgelines, pumped midtones, that plasticky hyper-real quality. With Auto Tone off, Lightroom simply stacks the tonal information from all three frames and hands you a flat, neutral DNG file with an enormous amount of recoverable data sitting in the highlights and shadows. That’s what you want. You’ll do the toning yourself.
Step 4: Repeat the HDR Merge for Each Column
 Second set of three bracketed frames selected in Lightroom
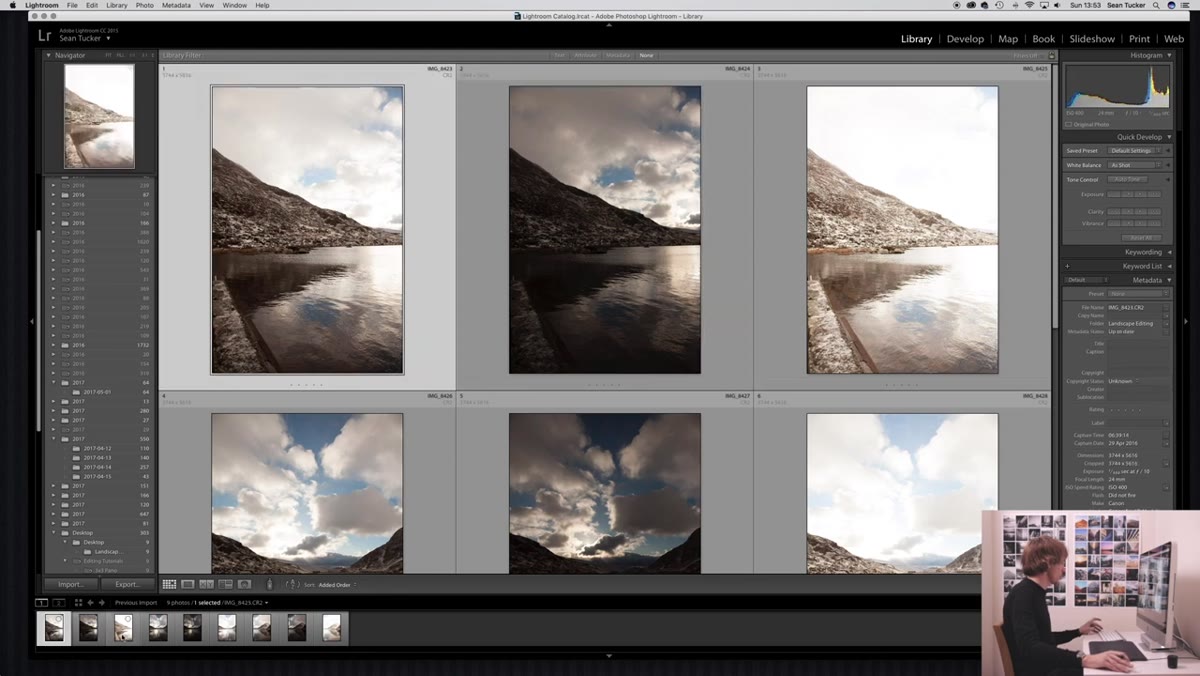
Do not skip this step or try to merge all nine frames at once. Merge each column’s three bracketed frames into its own HDR DNG separately. You’ll end up with three merged DNG files, one for each column position, left, center, and right. These are your panorama source files. Keeping them separate at this stage gives Lightroom cleaner geometry to work with when it tries to align and stitch the panorama in the next step. Label or stack them clearly in your catalog so you’re not hunting for them later.
Second set of three bracketed frames selected in Lightroom
Do not skip this step or try to merge all nine frames at once. Merge each column’s three bracketed frames into its own HDR DNG separately. You’ll end up with three merged DNG files, one for each column position, left, center, and right. These are your panorama source files. Keeping them separate at this stage gives Lightroom cleaner geometry to work with when it tries to align and stitch the panorama in the next step. Label or stack them clearly in your catalog so you’re not hunting for them later.
Step 5: Select the Three HDR DNGs and Merge to Panorama
 Three merged HDR DNGs selected, Photo Merge Panorama dialog open
Select your three HDR DNG files, right-click, and go to Photo Merge, then Panorama. Lightroom will project the stitch and offer you a few projection options: Spherical, Cylindrical, and Perspective. For wide landscape panoramas with a relatively distant horizon, Cylindrical tends to handle the curvature and edge distortion more gracefully than Perspective. Spherical works well if you’ve got a very wide arc, close to 180 degrees. Check the Boundary Warp slider. Pulling it up fills in the irregular edges that come from stitching without cropping aggressively, though pushing it too far will bow your horizon. I usually land somewhere between 50 and 70 and then do a final crop by hand. Hit Merge and let Lightroom do the math.
Three merged HDR DNGs selected, Photo Merge Panorama dialog open
Select your three HDR DNG files, right-click, and go to Photo Merge, then Panorama. Lightroom will project the stitch and offer you a few projection options: Spherical, Cylindrical, and Perspective. For wide landscape panoramas with a relatively distant horizon, Cylindrical tends to handle the curvature and edge distortion more gracefully than Perspective. Spherical works well if you’ve got a very wide arc, close to 180 degrees. Check the Boundary Warp slider. Pulling it up fills in the irregular edges that come from stitching without cropping aggressively, though pushing it too far will bow your horizon. I usually land somewhere between 50 and 70 and then do a final crop by hand. Hit Merge and let Lightroom do the math.
Step 6: Edit the Final Panorama DNG Like a Normal Raw File
 Final stitched panorama open in Lightroom Develop module
Here’s where the work you did in steps one through four pays off. Your merged panorama DNG behaves exactly like a raw file, but it contains the tonal range of all nine original frames compressed into a single editable document. Pull the highlights down and you’ll find cloud detail that no single exposure captured. Lift the shadows and you’ll see foreground information that would have been buried in noise on a standard raw. Sean’s approach from this point is conventional and restrained: work the basic panel, use graduated filters for sky-to-ground transitions, and leave the HDR origins invisible in the final image. The technique should serve the photograph, not announce itself.
Final stitched panorama open in Lightroom Develop module
Here’s where the work you did in steps one through four pays off. Your merged panorama DNG behaves exactly like a raw file, but it contains the tonal range of all nine original frames compressed into a single editable document. Pull the highlights down and you’ll find cloud detail that no single exposure captured. Lift the shadows and you’ll see foreground information that would have been buried in noise on a standard raw. Sean’s approach from this point is conventional and restrained: work the basic panel, use graduated filters for sky-to-ground transitions, and leave the HDR origins invisible in the final image. The technique should serve the photograph, not announce itself.
A Note from Twenty Years of Chasing Light
I’ll be honest with you: I resisted this workflow for a long time. It felt like too many steps between the shutter and the final image, and I’ve always been stubborn about keeping things simple in the field. But the morning I finally tried it on a shot of the Cascades reflected in a still alpine lake, I pulled shadow detail out of a granite foreground that I’d written off as a loss. The print from that file is now one of my best sellers. The nine-frame method isn’t about making the editing easier. It’s about not leaving information on the table that your eye saw and your camera almost captured.
The single most important idea in this workflow is deceptively simple: HDR in Lightroom, done without Auto Tone, is not a look. It’s a filing system for light. You’re not creating a stylized effect. You’re preserving data so that when you sit down to edit, the scene you actually witnessed is still recoverable.
Watch the full tutorial on YouTube to follow Sean Tucker’s edits in real time and see how the final panorama comes together from raw capture through finished image.
Comments
Leave a Comment